A roof installation is a significant investment that demands careful planning and execution. Understanding the entire process ensures you’re well-prepared and helps avoid unnecessary delays or costs. Below, we break down the essential steps involved in a professional roof installation.
Step 1: Initial Inspection and Planning
Before any work begins, a comprehensive inspection of your current roof is conducted. This step identifies existing damage, structural issues, or specific repairs that need to be addressed before installation. Key activities during this phase include:
– Assessing the condition of decking and underlayment.
– Identifying signs of moisture damage or leaks.
– Measuring your roof to calculate materials needed accurately.
Step 2: Removal of the Old Roofing System
Removing the existing roofing material is crucial for ensuring proper installation of the new system. Professional roofers will carefully strip away old shingles, tiles, or metal sheets while minimizing damage to underlying structures. During this phase: – Disposal of old roofing materials follows local regulations. – Reusable components are preserved (where applicable), such as flashing. – Decking is re-inspected for hidden damage once exposed.
Pro Tip: Look for contractors who include clean-up services as part of their agreement to prevent leftover debris on your property.
Step 3: Repairs and Preparation
Once the existing roof has been removed, any necessary repairs are made to ensure a solid foundation for your new roof. This step may involve: – Fixing damaged decking boards or replacing rotted sections. – Installing moisture barriers like ice-and-water shields in appropriate areas. – Reinforcing flashing around chimneys, vents, skylights, and other vulnerable points.
During preparation, contractors also ensure that ventilation systems are properly configured to improve airflow and prevent future issues like mold growth or excessive heat buildup in attics.
Step 4: Installing Underlayment
Underlayment is one of the most critical components of any roofing system. It acts as an additional layer of protection against water infiltration while providing extra durability. Depending on project requirements: – Synthetic underlayment may be used for enhanced tear resistance. – Felt underlayment offers added affordability without sacrificing protection quality.
Before moving forward with shingles or tiles, professionals verify that underlayment fits securely over every surface area.
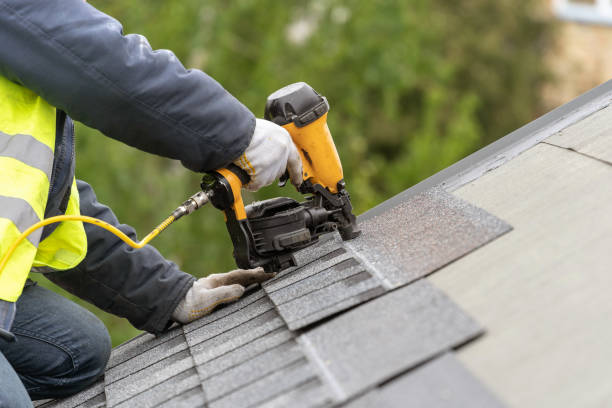
Step 5: Laying Roofing Materials
Roofing materials are installed according to manufacturer guidelines and local building codes. This process varies depending on material type: 1. Asphalt Shingles – Installed in overlapping layers starting at the eaves. 2. Metal Panels – Secured using screws with waterproof washers for stability. 3. Clay/Concrete Tiles – Fastened individually with adhesive or nails for a distinct appearance.
Each material type requires precision alignment to ensure uniformity across your rooftop while maintaining resistance against wind uplift or weather-related wear over time.
Step 6: Final Inspections
After installation is complete, thorough inspections guarantee all components have been installed correctly according to safety standards: – Flashings are checked for watertight seals around protrusions. – The slope’s consistency ensures proper water drainage without pooling issues. – Gutters are evaluated as part of seamless rainwater management integration.
Professional roofing teams typically provide warranties covering workmanship defects during this stage—offering peace of mind about long-term performance expectations from their work product.
By understanding these phases within a complete roof installation process—from initial inspection through post-installation evaluation—you’ll know what questions matter most when discussing timelines or pricing options with contractors transitioning your home toward better durability & aesthetics effectively tailored toward its individual needs!
Finding a Reliable Minneapolis MN Roofing Company for Accurate Estimates
When planning a roofing project, obtaining accurate estimates is one of the most critical steps. A proper estimate not only helps you budget effectively but also ensures transparency and prevents unexpected costs during or after the project. Here’s how to approach the process of getting precise quotes from professional roofers.
The Importance of Accurate Estimates from a Roofing Contractor Minneapolis MN
Accurate estimates provide clarity on:
– Material Costs: Knowing the exact quality and quantity of materials required.
– Labor Costs: Understanding how much professional expertise will cost.
– Timeline Expectations: Setting realistic expectations for when the work will be completed.
– Avoiding Hidden Fees: Preventing surprise charges that can arise if the estimate is vague or incomplete.
Steps to Get an Accurate Roofing Estimate for Roofing Services Minneapolis MN
- Look for licensed, insured, and well-reviewed contractors in your area.
- Check references and online reviews to ensure their credibility.
- Request that roofers visit your property rather than providing a quote over the phone or email without inspection.
- The size and pitch of your roof.
- Any existing damage or problem areas.
- Accessibility challenges that may impact labor costs.
- Provide Necessary Details
Be prepared to supply information such as: - Your preferred roofing material (e.g., asphalt shingles, metal roofing).
- The age of your existing roof and its condition.
- Any additional requirements (e.g., gutter replacement, insulation).
- Request a Detailed Breakdown
A comprehensive estimate should include:
| Item | Description | Cost Estimate | |———————|—————————————————–|—————| | Labor | Installation services, removal of old materials | $$$ | | Materials | Shingles, underlayment, nails, etc. | $$$ | | Disposal Fees | Waste removal for old roofing material | $$$ | | Permits | Local government permits (if applicable) | $$$ | - Compare Multiple Quotes
Obtain at least 3-5 estimates from different contractors and compare: - Pricing structure (avoiding unusually low quotes as they may indicate subpar materials or workmanship).
- Warranties offered on both materials and labor.
- Ask Questions
Don’t hesitate to seek clarification on unclear points in the estimate:- Are there any potential extra expenses?
- How long is this quote valid?
- Will subcontractors be used?
- Verify Licensing & Insurance
Ensure the roofer holds proper licensing in your state and has liability coverage as well as worker’s compensation insurance.

Red Flags to Watch For When Getting Estimates
- Vague descriptions with no detailed cost breakdowns.
- Demands for full payment upfront instead of staggered payments tied to project milestones.
- Lack of written contracts outlining terms clearly.
- Contractors refusing in-person inspections before providing an estimate.
Final Thoughts on Ensuring Estimate Accuracy
Accurate estimates are not just about price; they also reflect professionalism and transparency on behalf of your contractor. Investing time into a thorough evaluation process will help you avoid miscommunication while ensuring quality work at a fair price for your roofing project.
Getting Accurate Estimates from Professional Roofers
When planning a roofing project, obtaining accurate estimates from professional roofers is one of the most critical steps. A detailed and precise estimate ensures you understand the scope of the work, budget effectively, and avoid unexpected expenses. Here’s a breakdown of how to get accurate estimates, what to look for in them, and how to compare bids from multiple contractors.
Why Accurate Estimates Matter
An accurate estimate is more than just a price quote; it’s a detailed breakdown of costs, materials, timelines, and labor. When done correctly, it offers:
– Transparency: You’ll know exactly what you’re paying for.
– Budget Control: Helps prevent unforeseen expenses during the project.
– Comparison Tools: Allows you to weigh offers from multiple roofers based on value instead of just price.
Steps to Get an Accurate Estimate
- Look for licensed and insured professionals in your area.
- Check reviews online or ask for recommendations from friends or neighbors.
- Reputable roofers will want to inspect your property in person before providing an estimate. Avoid contractors who offer quotes without seeing your roof firsthand.
- Provide Detailed Information
Share specifics about your project with the roofer, such as:- The type of material you’d like (e.g., asphalt shingles, metal roofing).
- Your property’s size and existing roofing structure condition (if known).
- Any specific features like skylights or chimneys that may require extra work.
- Request Itemized Quotes
A professional roofer should provide detailed information on:- Material costs (shingles/sheets/etc.).
- Labor fees (hourly rates or overall cost).
- Additional services like old roof removal or waste disposal fees.
- Ask Questions Before Finalizing
To ensure clarity about the provided quote:- Confirm if warranties are included (on both labor & materials).
- Ask about any potential additional charges that might arise during the project.
Key Elements Found in a Good Roofing Estimate
| Component | Description |
| Material Costs | Detailed pricing for all roofing materials required for the job including underlayment and sealants |
| Labor Costs | Total projected hours and cost per hour or flat rate |
| Timeline | Estimated start date & duration of work |
| Disposal Fees | Cost associated with removing old materials & managing waste |
| Warranties/Guarantees | Details on warranties provided for both labor & materials |
Red Flags to Watch For
While reviewing estimates, be cautious about:
– Abnormally low bids compared to others — this might indicate poor quality work or hidden fees later. – Lack of proper licensing or insurance information in their documentation. – Vague descriptions without itemized details on pricing.
Tips for Comparing Multiple Estimates
- Focus on value over cost alone — quality craftsmanship often saves money long-term by preventing premature repairs.
- Verify timelines fit within your schedule needs.
- Check online reviews and consult references provided by each contractor.
Selecting the right roofer involves balancing budget considerations with quality expectations—accurate estimates play a crucial role in making an informed decision that ensures lasting results for your project.
Step-by-Step Guide to Preparing for a Roof Installation
Preparing for a roof installation is a critical step to ensure the process runs smoothly and efficiently. Proper preparation not only ensures the safety of your property but also helps roofing professionals complete their work without unnecessary delays. Here is a comprehensive guide to getting ready for your roof installation project.
Clear the Area Around Your Home
Before roofing work begins, it’s important to clear the area surrounding your home. This step minimizes obstacles and reduces potential hazards during the installation process.
- Move vehicles: Park cars, bikes, and other vehicles away from your driveway or garage to give roofers easy access.
- Protect outdoor furniture: If you have patio furniture, grills, or lawn décor near the house, move them to a safe location.
- Trim overhanging branches: If there are trees with branches hanging close to your roofline, ensure they’re trimmed back to provide workers with ample space.
- Secure fragile landscaping: Protect flower beds or delicate plants by covering them with tarps or temporary barriers.
Prepare Your Attic Space
Roofing projects can create vibrations and dust that may impact your attic. Taking precautions will help protect stored items and allow for easy cleanup afterward.
- Cover belongings stored in the attic with plastic sheets or tarps to keep them free from dust and debris.
- Remove any valuable or fragile items that could be damaged during the process.
- Check if there’s sufficient ventilation in your attic; this is also an excellent time to assess insulation levels.
Protect Interior Spaces
- Take down wall hangings such as photos, mirrors, or artwork that may fall during construction activity.
- Remove fragile items from shelves or mantels near exterior walls.
- Secure light fixtures like chandeliers if they’re prone to movement caused by vibrations.
Inform Neighbors About Upcoming Work
A roof replacement can be noisy and disruptive for those nearby. It’s courteous (and often appreciated) to notify neighbors in advance so they’re aware of what’s happening.
Consider these tips when informing neighbors: – Let them know when work will begin and how long it’s expected to last. – Assure them that professional contractors will keep noise levels manageable during reasonable hours. – Share contact information should they need assistance or have concerns during construction.
Arrange Access for Roofers
| Key Access Needs | Suggested Actions |
| Driveway/Parking | Keep driveways clear for trucks and equipment. |
| Power Supply | Ensure an outdoor electrical outlet is available if needed. |
| Roof Access | Remove any obstructions like locked gates or fences near ladders. |
Protect Pets and Children
- Arrange temporary care such as daycare services or pet boarding outside of working hours.
- Set boundaries within your home where children cannot roam unsupervised near construction zones.
This precaution ensures everyone’s safety while keeping distractions minimal for workers.
Review Your Roofing Contract
- Double-check timelines outlined in contracts with roofing contractors.
- Verify warranties on materials being used.
- Communicate any concerns about weather delays beforehand so expectations remain clear between both parties involved in progress updates.
By following these preparation steps diligently ahead of time—you’ll not only safeguard yourself against unnecessary damages but also establish trust among skilled professionals handling delicate rooftop installations directly tailored toward individual households alike too reliably every instance altogether efficiently overall long-term satisfaction guaranteed therein proactively executed end-to-end seamlessly streamlined workflow ultimately attainable productivity standards met accordingly consistently thereby ultimately ensuring success achieved collective mutual satisfaction completely fulfilled cooperative synergy throughout!

Expert Tips on Removing Your Old Roof Before Installation
Removing an old roof is a critical step in any roof replacement project. Proper removal not only ensures a smooth installation process but also helps protect the structural integrity of your home. Below are expert recommendations and considerations to ensure this phase is handled efficiently and safely.
Assess the Condition of the Existing Roof
Before starting removal, inspect the current roof to identify potential hazards or problem areas. Consider the following:
– Type of material: Asphalt shingles, metal roofing, clay tiles, or other materials may require different approaches for removal.
– Structural stability: Check for signs of water damage, sagging areas, or rot in the decking underneath.
– Visible damage: Look for mold, leaks, or pest infestations that may need to be addressed before proceeding.
Obtain Necessary Permits and Follow Local Regulations
Many municipalities require permits for roofing projects, including roof removal. Research local regulations to ensure compliance with zoning laws and safety requirements.
Assemble Tools and Safety Equipment
Having the right tools on hand will make the process more efficient while minimizing risks. Common tools needed include:
– Roofing shovel or pry bar for lifting shingles
– Hammer and nail puller for removing nails
– Utility knife for cutting underlayment or tar paper
– Heavy-duty garbage bags or tarps for collecting debris
Safety should be your top priority during old roof removal. Equipment such as gloves, safety goggles, non-slip boots, and fall protection harnesses is essential when working at heights.
Create a Plan for Debris Removal
Roof tear-offs generate considerable waste. To keep the site organized and safe:
1. Use a dumpster or rented disposal container positioned near your home for easy access. 2. Lay tarps around your property to catch falling debris. 3. Separate recyclable materials like metal from general waste whenever possible.
| Type of Waste | Disposal Method | Notes |
| Asphalt shingles | Local landfill/dump | Confirm if shingles are accepted locally |
| Metal roofing | Recycle center | Often reusable or recyclable |
| Wood decking (if damaged) | Waste facility | Properly treated before disposal |
Step-by-Step Roof Removal Process
- Clear Your Work Area: Remove outdoor furniture, vehicles, and other items around your home’s perimeter to protect them from falling debris.
- Start at the Top Edge: Begin by removing ridge caps before working your way down each slope of the roof.
- Work in Sections: Focus on smaller sections at a time to maintain control over debris management.
- Remove Underlayment: Once shingles have been removed, peel away any underlayment (such as felt paper) and inspect the decking below.
- Check Flashing and Gutters: Remove flashing around chimneys, skylights, vents, etc., if necessary—clean out gutters clogged during tear-off.
Inspect After Removal
With all materials removed down to the decking layer: – Examine wood sheathing thoroughly for rot or other damage. – Replace compromised sections promptly before proceeding with new roofing installation.
By following these expert tips and maintaining careful attention throughout every stage of roof removal, homeowners can ensure their property is well-prepared for a new roof installation that stands the test of time. Taking these steps minimizes risks during installation while setting up your home with a durable foundation for years ahead.
Key Considerations When Installing Roofing Materials for Long-Lasting Results
When it comes to installing roofing materials, focusing on durability and long-term performance is crucial. A well-installed, long-lasting roof not only protects your property but also minimizes future maintenance costs and improves energy efficiency. Below are some key considerations that can ensure your roofing materials stand the test of time.
1. Select the Right Roofing Material for Your Climate
Choosing the appropriate roofing material for your region is essential to increasing the lifespan of your roof. Each type of material functions differently depending on environmental factors such as temperature, humidity, and exposure to harsh weather conditions.
- Asphalt Shingles: Ideal for moderate climates with minimal extreme weather conditions.
- Metal Roofing: Excellent choice for regions with heavy snow, rain, or high winds due to its durability.
- Clay or Concrete Tiles: Suitable for hot climates as they resist heat and UV radiation effectively.
- Slate Roofing: Long-lasting option that works well in areas prone to severe weather but requires a strong structural foundation due to its weight.
By selecting materials suited to local conditions, you can enhance the longevity of your roof while reducing wear and tear.
2. Proper Ventilation is Non-Negotiable
- Mold growth in attic spaces.
- Moisture buildup that weakens roofing structures.
- Increased energy costs due to poor temperature regulation inside your home.
Ensure adequate intake vents (e.g., soffit vents) and exhaust vents (e.g., ridge vents) are installed during the roofing process. Proper ventilation prevents overheating in summer months and reduces condensation during colder seasons.
3. Quality Installation Practices
Even premium-quality materials can fail if not installed correctly. Hiring experienced professionals who adhere to local building codes ensures a watertight installation that withstands natural elements over time.
Key practices include: – Using appropriate fasteners based on material type (e.g., corrosion-resistant nails for metal roofs). – Properly aligning shingles or panels to prevent gaps where water could seep through. – Installing underlayment to provide an additional protective barrier beneath the main roofing material.
4. Regular Maintenance Extends Lifespan
| Maintenance Task | Recommended Frequency |
| Clearing debris from gutters | Twice annually (spring & fall) |
| Checking flashing around chimneys/skylights | Once per year or after storms |
| Inspecting shingles for damage | Annually or after severe weather |
| Re-sealing seams on flat roofs | Every 3–5 years |
By staying proactive with maintenance, you can protect your investment and maximize the life expectancy of your roof.
5. Weatherproofing Measures Are Essential
- Install ice-and-water shields in areas prone to snow or ice dams.
- Use high-quality sealants around flashing points like chimneys or vent pipes.
- Choose wind-resistant shingles designed specifically for storm-prone regions.
These additional precautions provide an extra layer of protection against premature aging caused by environmental factors.
By carefully evaluating all aspects of material choice, installation techniques, ventilation systems, maintenance schedules, and climate-specific needs, you can achieve long-lasting results from any roof project while minimizing future expenses associated with repairs or replacements.
Re-Coating vs. Re-Roofing: Understanding When Replacement Is the Best Option
When it comes to maintaining your roof, homeowners often face a crucial decision: should you re-coat an existing roof or invest in an entirely new roofing system? The right choice depends on several factors, including the condition of your current roof, your budget, and long-term objectives. Here’s a detailed breakdown to help you understand when replacement is the best option.
What is Roof Re-Coating?
Re-coating involves applying a protective layer over an existing roof to restore its functionality and improve durability. This is often done for flat or low-slope roofs made of materials like asphalt, metal, or membrane systems.
Benefits of Re-Coating:
– Cost-Effective: It is significantly cheaper than replacing an entire roof. – Extended Lifespan: A high-quality coating can add 5–10 years to your roof’s lifespan. – Energy Efficiency: Reflective coatings can reduce heat absorption and lower energy costs. – Eco-Friendly Option: By avoiding removal of old materials, re-coating reduces landfill waste.
However, re-coating only works if the underlying structure is still intact and free from major damage such as leaks or rotting materials.
What is Roof Re-Roofing?
Roof re-roofing refers to replacing the existing roofing system entirely—either by installing new shingles over the old ones (overlay) or tearing off the old roof before putting on new materials (tear-off).
Benefits of Re-Roofing:
– Enhanced Structural Integrity: A complete replacement addresses any underlying damage that could compromise safety. – Customization Options: You can upgrade materials for better performance and aesthetics. – Long-Term Solution: While costlier upfront, re-roofing guarantees a longer lifespan compared to re-coating.
Re-roofing becomes necessary when repairs are no longer sufficient due to extensive damage or aging.
When Should You Opt for Replacement?
| Factor | Opt for Re-Coating | Opt for Re-Roofing |
| Roof Condition | Minor damage; no leaks | Major structural issues |
| Roof Age | Relatively new (<10 yrs) | Near end of lifespan |
| Budget | Limited funds | Prepared for higher costs |
| Long-Term Goals | Short-term fix | Longevity-focused |
Key Indicators That Replacement is Necessary: 1. Multiple leaks visible throughout the structure. 2. Sagging areas caused by water damage or weakened decking. 3. Persistent mold growth from long-term moisture exposure. 4. Shingles that are curling, missing in large sections, or deteriorated entirely.
Professional Assessment Matters
Whether choosing to re-coat or replace your roof, consulting with a professional roofer ensures you make an informed decision tailored to your property’s unique needs. They will conduct a thorough inspection to evaluate the extent of wear and tear while offering solutions aligned with your budget and goals.
Making this investment wisely ensures that your home remains protected from environmental elements while preserving its structural integrity over time. Proper maintenance and timely action can save homeowners significant repair costs down the road.
- Key Signs Every Homeowner in Minneapolis MN Should Know When Hiring a Roofer
- The Complete Roof Installation Process with a Trusted Minneapolis MN Roofer
- When to Choose Roofing Services Minneapolis MN for a Roof Replacement?
- When Should You Hire a Minneapolis MN Roofer for a Roof Replacement?
- Effective Strategies for Success with a Roofing Contractor Minneapolis MN
- Understanding the Complete Roofing Services Minneapolis MN Installation Process from Start to Finish